
Introduction Part 2: Execution
Transform ideas into executable tasks

Introduction
This article will cover one of the most difficult tasks within all of product management - taking high level ideas and converting them into actionable tasks that an engineering team can work against. While it will cover some sample techniques and best practices for completing this difficult task, it is important to understand that there are plenty of frameworks for completing this task. Additional links for these frameworks can be found in the additional resources section at the end of this post. This installment of the series is divided into the same three parts as last time:
Contextual Scenario - Explore this part of the process through the context of a hypothetical situation by role playing as a product manager at Transportation Perfect Software.
Knowledge Review - Review and highlight key concepts from the scenario in greater detail.
Additional Resources - External resources that can elaborate on some of the topics discussed at a high-level in this article.
Like the series? Please consider subscribing to get future updates right in your inbox!
Building a Better Transportation Algorithm
Continuing with the scenario from last article, imagine that you are a product manager at Transportation Perfect Software, and you have been tasked with creating a platform that leverages A.I. and strong user experience to help make better trucking routes. After completing your initial user journeys and understanding your stakeholders, you begin thinking through the features and capabilities for the platform.
Key Components
After returning from Idaho, you book a meeting room with a huge whiteboard space for yourself, so that you can begin the brainstorming process. Once there, you look through the large list of pain points and needs that you gathered from listening to Josh. While the pain points are relative to parts of the process, you begin to see some common themes among them. So, you take a dry erase marker and start sketching out ideas on the whiteboard in an attempt to think about common themes and threads that you see between all of the different notes that you took. You begin to organize your thoughts by grouping different pain points and themes into a component-based structure. After some revisions and different visualizations of the groupings, you finally come up with the following list of components that can have features built against them:
Data Management - Adding, editing, and manipulating data is time consuming and often very difficult in today’s process.
Route Coordination - Sending route sheets for approval or review is an arduous task that requires a high amount of coordination and is very time intensive.
Sandbox Analysis - When creating routes, users need a better way to look at different possible route configurations while saving and having access to baseline configurations.
Route Quality - The most difficult part of the process seemed to be determining where to start with a route, as there was no “baseline” for a router other than gut feeling. This has led to a disparity among the quality of the routes as some routers have very “good” guts while others are not as fortunate. The ones that seem to perform well have created some basic logic flows to help them create a baseline, such as using formulas and weighted averages to assess many options, and don’t just simply “guess and check” their work.
While you are sure that there are more components that will emerge, you start with this list so that you can get a quick prototype up and running that you can discuss with your end users. You save some other pain points and notes that don’t fit into these components for later review as the platform gets built out over time.
User Flow Map
Now that you understand your core components for your product, you begin dissecting how to make a better flow for the routing process in the new software. You decide that starting with a single “high level” flow is the best way to communicate your ideas to both the engineering and user interface/experience (UI/UX) teams. Using your digital whiteboard tool from before, you come with the following flow diagram:
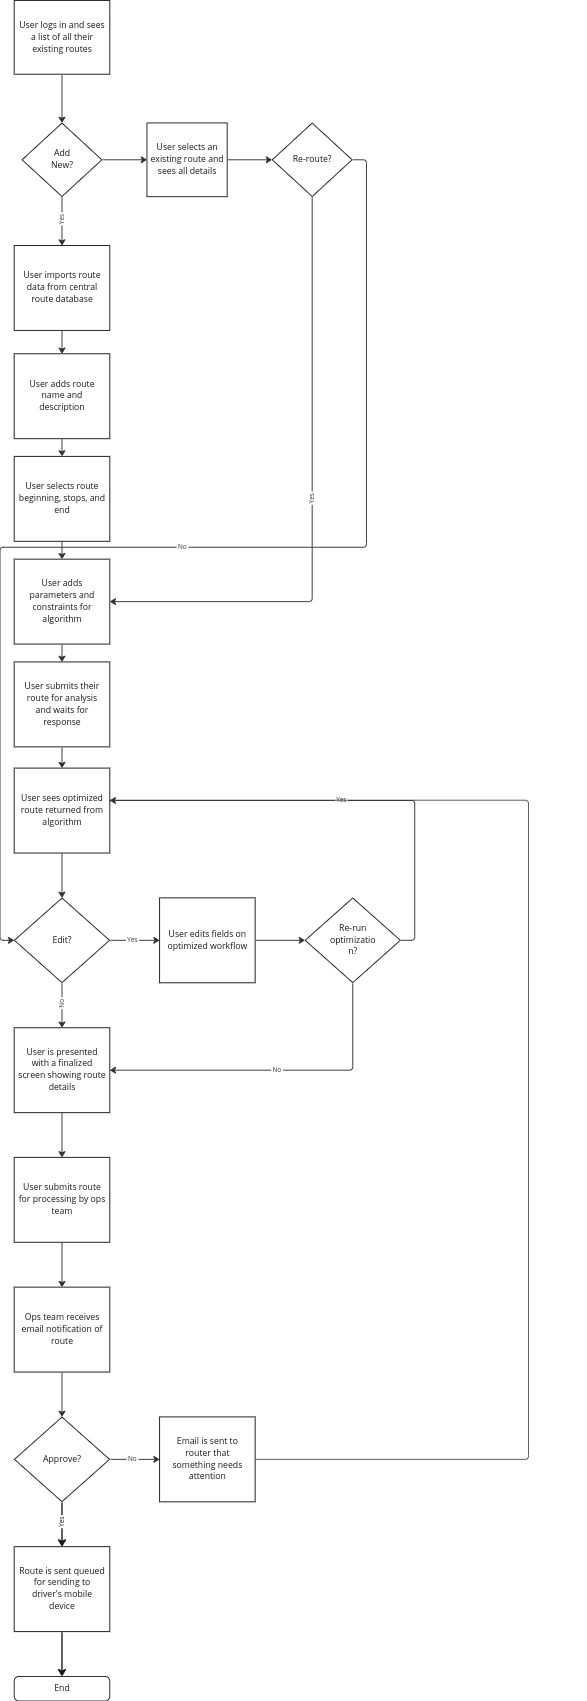
While you know that each step in this diagram needs be drilled down into more detail for actual development, you use this as a baseline talking point for upcoming discussions with your stakeholders.
Socializing the Flow Map and Starting the Process
You setup a series of meetings with a bunch of different stakeholders to review the flow map, to ensure that it addresses the needs of the users and is not missing any critical steps. You decide to meet with the following list of people:
Josh - Routing Lead
Kate & Larry - UX Designers
Jerome - Tech Lead
Dan - Product VP
While review this flow, you capture some notes on a few minor tweaks to the process, but overall everyone agrees with the vision of where you want to go with your product. You setup a meeting with your company’s project manager and ask them to help coordinate timelines, assign tasks to others, and track progress as needed. Using a Kanban board, they setup tasks and a timeline for everyone who will be helping you with this process. You and your project manager set clear expectations for each assigned task, and assign the cards to all the stakeholders as shown below:
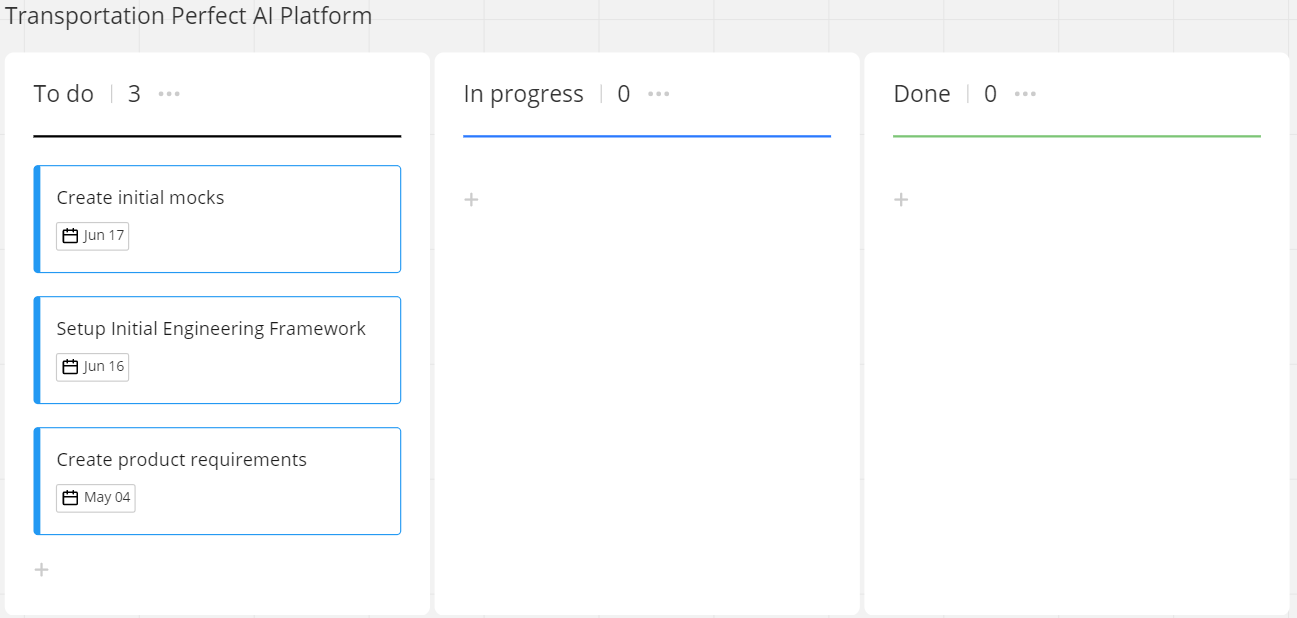
Everyone is eager to get to work, each one moves the card to the “in progress” column and begin working towards the common goal of delivering an excellent routing platform.
Requirements Design
While everyone gets busy with their pieces of the product puzzle, you begin doing creating the detailed product requirements. Your VP has asked that you provide the following deliverables before beginning the engineering process:
Product Scope - A short one to two page document that outlines the objective(s), in scope, and out of scope features for the effort.
Scope Breakdown - A series of definitions and process maps to help explain the every little process in detail. This includes definitions of specific terms and flows for engineers to understand the end to end process along with the personas whom will be using this software.
Decomposed Product Requirements - To help expedite the engineering process in the small company, you have been tasked with creating small enough tickets for engineers to work on individually in a Kanban board, similar to the one shown above. To make your life easier, you setup a template for each ticket which includes the following fields:
A user story
Acceptance Criteria (details)
Interface mocks (if applicable)
Technical specifications (if applicable)
Product Scope
Your VP was very specific to say that the scope document needed to be short and to the point. You spend about an hour iterating and writing a scope document that you finalize and add to your company’s documentation system. The document contains the following sections:
Header: Name, Effort Name, Anticipated Completion Date, Document Status
Objectives:
Delivery a tool with an end-to-end working workflow by June of 2023
Create an initial routing algorithm that can route trips with at least 3 stops by July of 2023
In-Scope Features:
Tracker data upload and mapping from spreadsheet
Route overview page
New route creation with up to 3 stops
Routing overview page
Route editing
Map view of route
Automated (algorithmic) routing for at least 3 stops
Out-of-Scope Features
Automated routing for more than 3 stops
Advanced route editing (geo-mapping)
Data visualization
Data upload via API
Scope Breakdown
With your scope completed, you review it with your VP and relevant stakeholders (engineering, UX, etc.). They all approve and use it as a starting point for their specific tasks as well. You then start work on your scope breakdown, as it will inform all of the details needed for your new system. For sake of simplicity in this article, the outline of the document is shown below, but details will not be added.
I. Executive Summary - Contains a one-page summary of the effort in general.
II. Definitions - Contains a list of key terms and definitions relative to the effort.
III. Related Personas - Either has links to persona bios or shows details about the specific personas utilizing the software.
IV. Process Overview - Provides a detailed summary of the entire end-to-end process and what users are expected to do within the tool.
V. Specific Process Flows - Shows all of the user flows for various levels of features (i.e. how exactly a user goes through the import process, etc.). This includes the mocks related to the process and descriptions of why a process is needed.
Decomposed Product Requirements
Once the first draft of your effort overview document is completed, you start in on the long task of creating decomposed product requirements that can tangibly be used by the engineering team. This process involves organizing your features into groups and finding the right “size” for development tickets. Using your scope features as high-level guides, you come up with a product hierarchy to track progress and development against. The sample below shows the decomposition of the route overview page feature:
Route Overview Page
View and edit all routes
Add new route
Search all routes
You then beginning adding in specific user stories with detailed acceptance criteria, and each ticket added begins to look like the following sample story:
Name: View and Edit All Routes
User Story
As a truck router, I want to see a list of all my routes that I can select and open, so that I can quickly see what routes are added to the system and edit them as needed.
Acceptance Criteria
User is able to see a page containing a list of all their routes with the following fields:
Route Name
Route Owner
Date Added
Status
Trucker(s)
Operations Status
User sees a way to select a route and perform the following actions:
Edit route name
Edit route details (takes them to a specific route’s overview page)
Delete route
Reassign route
Change route status
You repeat this process for all of the different features and sub-features over the course of a few days. Once completed, you link specific sections of your scope breakdown document to your requirements, to ensure that the engineering team has access to the all of the flow diagrams and specific details of each feature added to the system.
Mock-Ups and Interface Designs
As your are working through your requirement decomposition, you get a call from Kate & Larry on the user interface team. They then ask to setup a series of calls to review your breakdown document and ask questions about the process, and what you had visualized for each step. Prior to the call series, you use your trusty whiteboard tool to draw out some initial wire-frames to show your rough ideas of what you had imagined specific screens looking like. After the second meeting, they bring over some of their designs and ask you about specific features and you provide them feedback and guidance on how to refine the early designs.
After a few cycles of refinement with just you and the design team, you ask Josh to join the meeting to provide his thoughts and opinions as well. He points out a few flows that are cumbersome or unnecessary, and you correct your scope breakdown to accommodate the changes while the design team does the same with their mocks. After two or three meetings, you all agree that the first draft of the mocks and tool look good and are good enough to start. You asked the UI team to come up with finalized mock-ups, so that you can use screenshots of these very detailed mocks within the individual tickets to help engineers better visualize the requirements.
Engineering Kick-Off
Once you get your requirements into a refined enough state for review with the engineering team, you then start setting up the final set of initial product requirement meetings.
Meeting 1: Engineering Lead Overview
You first review the requirements with your engineering lead, Jerome, in great detail. You provide explicit details on key items that they should focus on (i.e. important capabilities and specific design concerns). After the initial dump of information, Jerome states that he would like to meet with you the next day to provide some recommendations and ask questions.
The next day, you spend a while with him updating the tickets and requirements based on engineering feedback and feasibility of feature requests. This process of going back and forth teaches you a lot about the engineering process, and you even start to pick up some of nuances about how best to work with the engineering team at Transportation Perfect Software.
Meeting 2: Engineering Team Kick-Off
After getting approval from your engineering lead, you then schedule your last meeting of the initial design process with the whole engineering team. During the call, you and Jerome spend time reviewing all of the requirements in detail, as well as provide a high-level view of what the tool is all about. The meeting lasts a while as the engineers have many questions, but eventually you get through all of the requirements and the meeting begins to come to a close. It ends with the engineering manager reviewing the schedule of development from the project management team, with the first development cycle starting next Monday. You leave the meeting extremely eager to see how the first iteration goes, knowing that it you will soon get to see your software vision come to life.
To be continued…
Did you think someone else would enjoy or benefit from these articles? Please consider sharing it with them!
Want to know what happens next? Don’t wait for it to pop-up in your feed - subscribe now!
Knowledge Review: The Requirements Process
The requirements development process is often seen as the most difficult part of the product manager’s job, as mentioned in the beginning of this article and shown throughout the example above. The process involves a lot of organization, attention to detail, coordination with other departments, and serious iteration. These pieces are all necessary because they help take a very high-level vision and turn it into bits and pieces that engineers can develop and build software against. There a ton of frameworks for this process available on the internet that many different companies use in their development cycle. Instead of picking one and discussing it, this article will present a series of steps that have been seen as best practices from various development frameworks, and elaborate on each step. Bear in mind that most of these techniques rely on an Agile development approach. For a better description of what Agile is, please see the resource section. Resource links are also available for other types of requirement and development frameworks.
Based on the scenario above, there are five steps for developing requirements and delivering them to the engineering team, which are listed below. Each one of these sections will be elaborated on in the following sub-sections.
Develop a High-Level Workflow
Kick-off the Effort
Create Product Documentation
Review and Refine Mock-Ups
Present Requirements to the Engineering Team
Develop a High-Level Workflow
Creating a high-level workflow is an important first step in the requirements development process. This process flow should show all of the high-level actions that a user will take as they go through the tool to complete the actions intended to be executed within the tool. Try not to focus too much on what should and what not be included within this workflow diagram, as more detail will always help inform the steps that occur after this one.
The process workflow should be created within a flow diagram that can be shared with the entire team. The high-level flow should outline the following step types in the process:
Actions that the user needs to take
Yes/No decisions that the user needs to take
Beginning and ending points
There are more complex step types that can be included in a flow chart, but these are the core ones to start with. Once the chart is created, it is extremely important to share it with multiple stakeholders to get their opinions and test your assumptions and biases. Try and focus only on what the user needs to do, not how they do it (i.e. state that the user should a way to add a new trip as opposed to stating that they need to hit a button to add a new trip). The how is determined by the engineering and UI/UX teams when they get involved in the process. For reference on how to make a good flow diagram, follow the link provided in the additional resources section below.
Kick-Off the Effort
Creating a new product is not (and should not be) an individual effort. Involving all of the parties who will help build the tool early on is extremely important for a successful new product launch. While the scenario highlighted a few departments that may be included in this step, there are often more stakeholders involved in larger organizations. Here is a basic a list of possible attendees of the product kick-off meeting and what their takeaway actions would be:
Engineering Lead - Uses their high-level understanding of the effort to begin drafting and designing a system architecture that can support the new product, which can be then be filled in with the details from the future product documents.
UI/UX Designers - Reviews the initial workflow and starts drafting designs and interface components that would make the user’s flow simple and easy.
Project Management - Leaves the meeting with a better understanding of the scope of the effort and starts working with the other departments to establish timelines. They will help frame the development timeline and steps in the framework a company likes to use for development, and are great resources for development process questions. Sample development frameworks are linked in the additional resources section below, as the scenario listed a sample one called Kanban development.
Users - Any internal stakeholders who will help inform the use cases of the tool can be present to help answer questions on the new workflow and what they need. They may not have any direct takeaway items, but can provide quick answers to process questions as they arise.
Executives - These stakeholders will leave the meeting with a better understanding of what the product manager is planning to do and may setup follow-up meetings to help guide vision and inform direction of the product as it relates to a company’s strategy and goals.
Create Product Documentation
Not surprisingly, this part of the effort takes the most effort and the longest amount of time. Creating documentation is often divided between a product manager and business analyst within large product organizations. The product manager helps with the vision and initial feature set of the effort, while the business analyst breaks the high-level vision down into small pieces and oversee the execution the effort on behalf of the product manager.
The specific documents delivered in this effort do vary across organizations, but the documents mentioned in the scenario are a pretty good representation of what is expected from the product team in terms of requirement document deliverables. Each document from the scenario is listed below with extended definitions.
Product Scope - A short one to two page document that outlines the objective(s), in scope and out of scope features for the effort. This document needs to have enough details so that anyone in the organization can understand the high-level vision of features for the effort. The goal of this document is to create a nice “executive summary” for the effort without over elaborating on specific details, making the exact length and details within the document more of an art than a science to get correct.
Scope Breakdown - A series of definitions and process maps to help explain the entire process in detail. This includes definitions of specific terms and flows for engineers to understand the end to end process along with the personas whom the process is supporting. This document goes by many names in different organizations, but the premise is still the same: provide a single document with all of the specific process flows and details for the effort, so that the engineering team has an easy reference point when development starts. The scope breakdown needs to be long and detailed, so that no important details are missed. It is a very iterative document, and as it is socialized with the rest of the team, it will change when different assumptions get tested. This document also serves as a solid starting point for decomposing the product requirements, as workflows can be broken down into smaller stories later on, once every workflow has been thought through.
Decomposed Product Requirements - Once the workflows are completed and details have been added, it is time to break the scope breakdown into smaller pieces that engineers can execute against. This process involves creating user stories and adding specific details called acceptance criteria. Each section within a ticket is listed in the bullet points below:
A user story
Follows the formula: “As a {insert user type}, I want to {action}, so that {add why they need to do the action}.
Acceptance Criteria
Specific details about what a user needs to do that highlight all of the small details such as button names, etc.
Interface mocks (if applicable)
Attachment of mock-ups or links to prototypes
Technical specifications (if applicable)
Leave this section for the engineering team to fill in as needed
Once all of these documents are completed, the product team needs to socialize them with all of the departments from the kick-off meetings. This will help them better understand the scope of the effort, and take action as needed relative to their departments (i.e. engineering can make a refined architecture). With the details in place and ready to go, the product manager can then move on to the next step. For additional examples and expanded definitions of user stories and acceptance criteria, see the additional resources section.
Review and Refine Mock-Ups
This process is also highly variable across different organizations, but the end goal is always the same: create a set of high-fidelity mock-ups that provide engineers with a visual representation of what needs to be built. Note that mock-ups are only needed for applications that have graphical displays, and are not needed for APIs and other types of back-end systems.
Mock-Up Types
There are three different types of mock-ups, and understanding what each one is can help a product manager better understand what a user interface designer needs from product, and needs to design themselves. There are three types:
Wire-frames - Rough sketches of what a product can look like that can be used to help inspire more detailed mock-ups. These are typically done in a non-UI development tool such as whiteboard, digital whiteboard, or digital wire-frame tool. An example of a wire frame is shown below:

Low Fidelity Mock-Ups - These mock-ups take the wire-frames and turn them into more distinct and realistic screens within a UI design tool. Think of them as the “rough draft” of mock-ups, as they are typically the ones used for iteration discussions. This is because they have enough detailed visuals for meaningful discussions about a design, but don’t require hours of changes when discussions about them inevitably change requirements. Some examples of low fidelity mock-ups are shown in the image below:

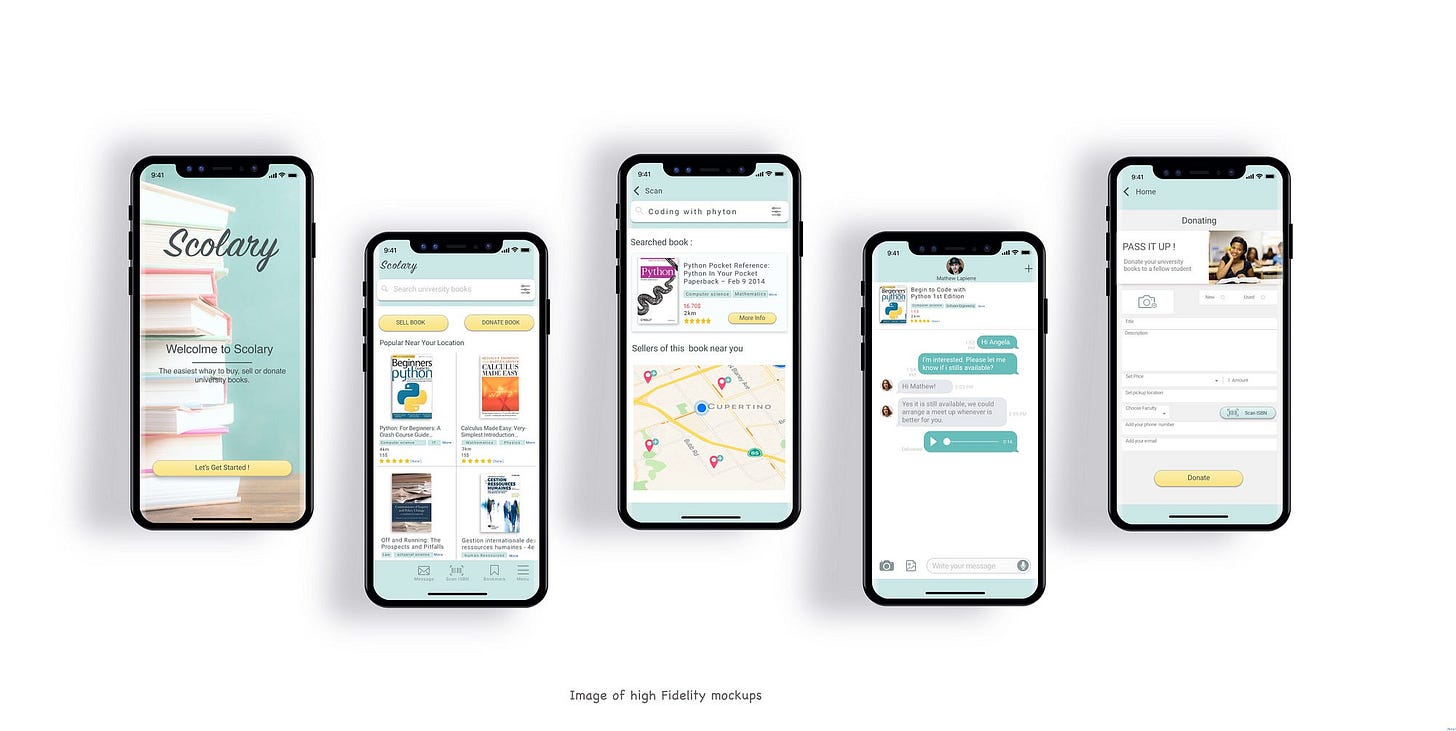
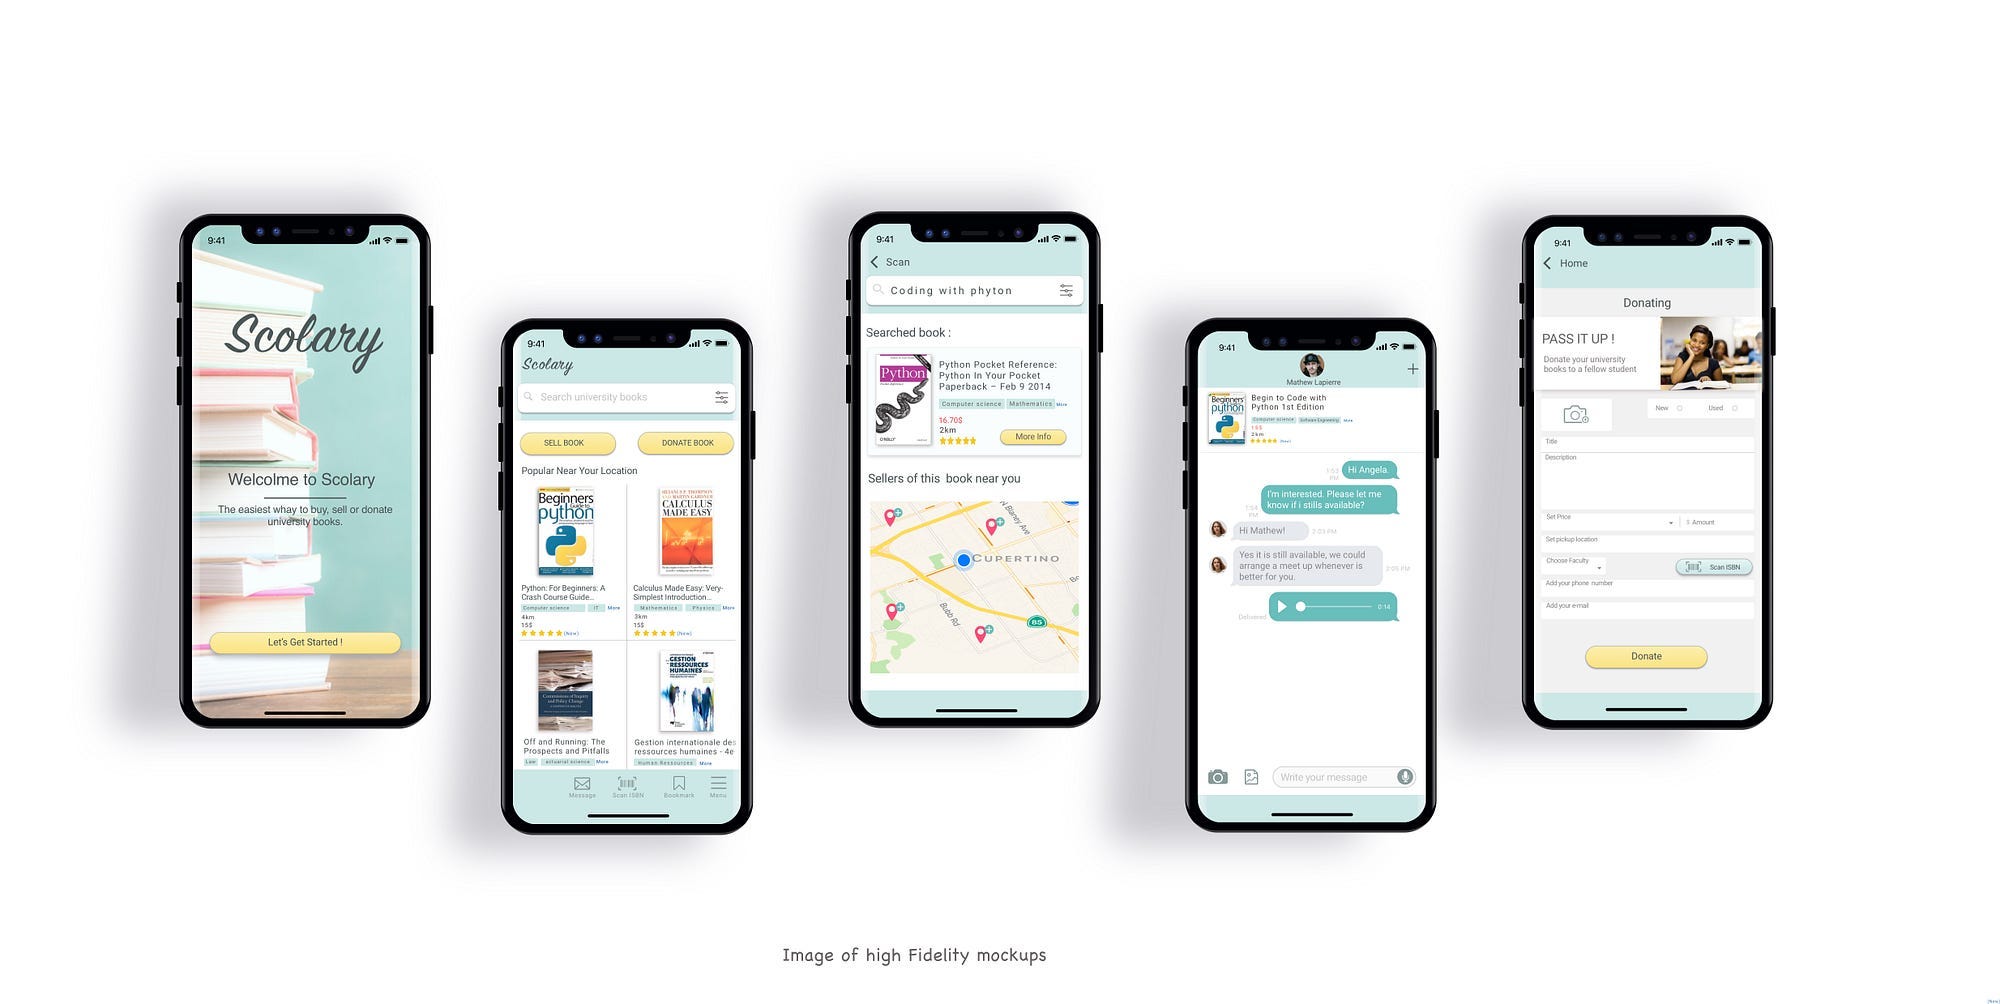
High Fidelity Mock-Ups - These are “final drafts” of mock-ups that are given to engineers. They contain a significant amount of detail and have nearly all of the small details filled in and should show what the end product needs to look like. These are the mock-ups used when starting marketing and selling discussions, if the product is to be sold externally. An example is shown in the image below:


Socializing the Mock-Ups
As discussed in the scenario, socializing the mock-ups is the important part of this step. Showing everyone a visual representation of the tool is an incredibly powerful way to ensure that everyone understands what the tool will look like and be able to do. This process can take time, but working through questions that stakeholders have about the design will ensure that the initial tool has enough different view points on it to have at least considered most of the assumptions added within the mock-ups. It is recommended that a product manager review the mocks with at least group of stakeholders included in the kick-off, and if possible, end users as well. The more opinions and viewpoints that can be considered, the better the final mock-ups and end tool will be. As a final warning however, do not waste hours of making mock-ups perfect. This will extend timelines for little added value, and make the process far longer than it needs to be. Balancing time spent on mock-up refinement is definitely an art than many user experience and user interface designers gain as a skill over time.
Engineering Kick-Off
While this process can technically happen during the steps above, it is listed as the last part since the meeting with all of engineers typically happens very last when starting the development of a product. This step is split into two pieces: engineering lead discussions and engineering team kick-off.
Engineering Lead Discussions
A strong relationship between a product manager and engineering lead is essential for a great product to be developed. Frequent discussions about requirements and thoughts about the product between these two individuals will help share a relationship that can help drive innovation with realistic engineering deliverables. While there is no set format or cadence for these meetings, here are a few tips to consider when conducting them:
Ensure that near the conclusion of a meeting, a follow-up appointment is set if there are still questions to be answered.
Setup a shared space for collaboration and discussion either digitally or in-person if a whiteboard is available. There will be a lot of concepts and ideas to discuss, so capturing and sharing detailed notes between product and engineering becomes essential.
Understand engineering limits and concerns, since these often get overlooked and deliverables become consumed by technical debt if they are not managed effectively.
Ensure that the engineering manager knows where to add notes to requirements for technical specifications, as there are requirements that the engineering lead needs to provide to the engineering team to successfully develop a feature.
Engineering Kick-Off
When the engineering lead is satisfied with the requirements, the final kick-off is scheduled. The main goal of this discussion is to provide the entire engineering team working on the effort with the product vision and direction of where the product is going and what it needs to do. Spend this time going through all the details, and have a question session at the end. Taking questions throughout the meeting will slow it down too much, and often times questions get answered as new details are revealed and explained. This meeting may take more time than allotted, so be sure to setup either follow-up time, or schedule more time than initially anticipated. Engineers often ask some very detailed questions, so listening their input can also help to quickly shape up and refine requirements.
Conclusion
While this process is not always as clean and cut as this article may make it seem, it really as a balancing game of detail and communication. A successful product manager learns the art of breaking down their ideas in actionable tasks over time, and it simply takes time to learn. Focus on helping describe what the product needs to do and why. If that is done well, all of the other pieces into place. The next article will start talking about what to do when the initial product is delivered and where to go from there, so don’t miss it!
Additional Resources
This section contains the links mentioned in the previous sections, with access to online resources that can help elaborate on the complex concepts barely discussed in this article.
Flowchart Design: https://asq.org/quality-resources/flowchart
Development Frameworks: https://premieragile.com/types-of-agile-frameworks/
Product Requirement Design Frameworks: https://www.pmi.org/learning/library/developing-product-requirements-tools-agile-process-9327
User Story Example: https://www.atlassian.com/agile/project-management/user-stories